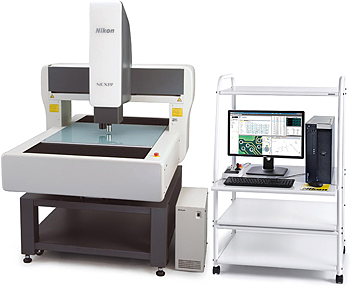
Nikon introduces the “NEXIV VMZ-R3020” and “NEXIV VMZ-R6555”
CNC Video Measuring System offering high accuracy and speed
September 25, 2013
Nikon Corporation (Makoto Kimura, President, Tokyo) is pleased to announce the release of CNC Video Measuring Systems “NEXIV VMZ-R3020” and “NEXIV VMZ-R6555,” capable of accurately measuring the dimensions and shapes of high-density and multi-layered electronic components.
Product information
| Product Name | CNC Video Measuring System NEXIV VMZ-R3020, NEXIV VMZ-R6555 |
|---|---|
| Availability | From October 25, 2013 |

Product Development Background
Utilizing optical measuring technology and image processing done by the computer, the CNC Video Measuring System automatically measures the dimensions and shapes of electronic components. The system processes the images taken by the CCD camera for precise edge detection.
The NEXIV VMZ-R3020 and VMZ-R6555 follow the basic performance of the NEXIV VMZ-R4540, which was launched in February 2013 and now has a good reputation among users. These products have been developed to enhance accumulated measuring accuracy and speeds, and enable a wide range of measurements with their improved operability and functions. The product portfolio has been strengthened with these two new products in the NEXIV VMZ-R series.
The NEXIV VMZ-R3020 maintains the basic measuring performance and meets the demand for downsizing such as shorter stage strokes, smaller dimensions and lighter body weight. The NEXIV VMZ-R6555 allows for faster measurement on the larger size of printed circuit boards. Automatic measurement of many smaller parts on the large pallet contributes to reducing the cost of parts inspections.
Key Features
1. Highly Accurate and Fast Measurements
A high measurement accuracy level has been achieved with Nikon’s proprietary liner encoder. In addition, an increase in frame rate and faster lighting control have accelerated overall measuring throughput.
2. Measurement Flexibility
The TTL Laser Autofocus offers high measuring capability and allows for even the thinnest transparent plates to be measured. Furthermore, the variable angle ring illuminator allows for easier edge detection on complex or blurry machine parts edges, mold parts and high-density printed circuit boards.
3. Advanced Operability
Work efficiency has been achieved by reducing the number of steps needed to create teaching files. Developed for easier understanding and better comprehension, the newly added “Guide Panel” function has improved the main program. Still available are the highly rated functions, such as the “Customizable Screen” and “Online Software.”
Main Specifications
Swipe horizontally to view full table.
| VMZ-R3020 | VMZ-R6555 | |
|---|---|---|
| Stroke (X x Y x Z) | 300 x 200 x 200 mm | 650 x 550 x 200 mm |
| Measurement Accuracy | (XY 1 axis) 1.2 + 4L / 1000μm (XY 2 axis) 2.0 + 4L / 1000μm (Z axis) 1.2 + 5L / 1000μm |
|
| Auto Focus | Laser AF, Image AF
|
|
| Illumination | Diascopic, Episcopic, 8-segment LED ring illumination (3 incident angles) |
|
| CCD Camera | B&W 1/3 CCD·Color 1/3 CCD (Color: type 1, 2 and A only) | |
| Magnification / Field of View | Type 1 : 0.5 — 7.5x · 9.33 x 7 — 0.622 x 0.467 mm Type 2 : 1 — 15x · 4.67 x 3.5 — 0.311 x 0.233 mm Type 3 : 2 — 30x · 2.33 x 1.75 — 0.155 x 0.117 mm Type 4 : 4 — 60x · 1.17 x 0.875 — 0.07 x 0.068 mm Type TZ : 1 — 120x · 4.67 x 3.5 — 0.039 x 0.029 mm Type A : 0.35 — 3.5x · 13.3 x 10 — 1.33 x 1 mm |
|
| Guaranteed Loading Capacity (Weight) | 20 kg | 50 kg |
| Dimensions (W x H x D) | Approx. 700 (W) x 1795 (H) x 730 (D) mm | Approx. 1200 (W) x 1820 (H) x 1640 (D) mm |
| Main Unit Weight | Approx. 245kg | Approx. 665kg |
| Power Source | AC100 – 240V, 50 / 60Hz | |
| Power Consumption | 5 – 2.5A | |
The information is current as of the date of publication. It is subject to change without notice.
